


Introduction
Hair extensions are a fantastic way to add length, volume, and style versatility to your hair. Two popular types of extensions that have gained attention for their natural look and easy application are Tape-In Extension and brazilian knot hair extensions. If you’ve ever wanted to try these extensions but felt overwhelmed by the process, this guide will take you step by step through applying both methods safely and effectively.
Understanding Tape-In Extensions and Brazilian Knot Hair Extensions
Before diving into the application process, it’s important to understand what these extensions are and how they differ.
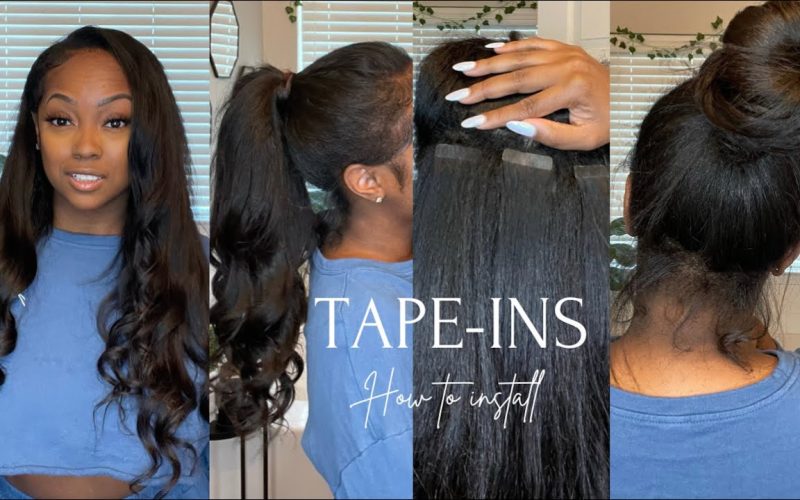
Tape-In Extensions are pre-taped wefts of hair that stick directly to your natural hair using a medical-grade adhesive. They are lightweight, reusable, and provide a smooth, seamless look. They usually last for 6–8 weeks before needing reapplication.
Brazilian Knot Hair Extensions, also known as microbead or microlink extensions, involve attaching small sections of hair to your natural hair using tiny knots. These knots are durable and allow the extensions to move naturally with your hair. They can last longer than tape-in extensions if properly cared for.
Both options are excellent for adding volume and length, but the application process is slightly different. Let’s go step by step.
Step-by-Step Application of Tape-In and Brazilian Knot Hair Extensions
Step 1: Prepare Your Hair
Whether you’re using Tape-In Extension or brazilian knot hair extensions, starting with clean hair is crucial. Wash your hair with a gentle shampoo and make sure it’s completely dry. Avoid using conditioners that leave a slippery residue, as this can affect the adhesion of tape-in extensions or the knot security of brazilian knot hair extensions.
Next, detangle your hair thoroughly. Use a wide-tooth comb to remove knots and tangles, paying special attention to the roots where the extensions will be applied. Smooth hair ensures a stronger bond and a more natural finish.
Step 2: Section Your Hair
- For Tape-In Extension: Divide your hair into horizontal sections, starting from the nape of your neck and working upward. Use hair clips to keep the upper layers out of the way. The sections should be thin enough to allow the tape to sit flat against your natural hair without being visible.
- For Brazilian Knot Hair Extensions: Similarly, section your hair, but in smaller strands. Since brazilian knot hair extensions rely on small, secure knots, thin sections are necessary to prevent tension on your natural hair and ensure the knots stay in place.
Step 3: Applying Tape-In Extensions
Now, let’s apply Tape-In Extension step by step:
- Peel the Tape: Each tape-in weft has a protective layer. Gently peel it off to expose the adhesive.
- Position the Extension: Place the extension underneath a section of your natural hair, close to the roots but not touching your scalp directly.
- Sandwich the Hair: Take another tape-in piece and press it on top of the same section of hair, creating a “sandwich” with your natural hair in between. Press firmly to secure the adhesive.
- Repeat the Process: Move upward in layers, following your sectioning plan. Make sure each row is even and the tape isn’t visible through your hair.
After all tape-ins are applied, gently brush your hair to blend the extensions with your natural hair. You now have instant length and volume.
Step 4: Applying Brazilian Knot Hair Extensions
For brazilian knot hair extensions, the process involves tying small knots to attach the extension hair:
- Take a Small Section of Hair: About the thickness of a pencil, which will help keep the knot secure without stressing your hair.
- Position the Extension: Place the extension strand near the root of your natural hair.
- Tie the Knot: Use the tiny knot technique (or the bead if using microlink extensions) to secure the extension to your natural hair. Make sure it’s tight but not pulling uncomfortably.
- Repeat Across Sections: Continue attaching extensions in horizontal rows until your hair is fully extended. Keep checking the balance and distribution for a natural look.
Brazilian knot hair extensions offer flexibility in styling and tend to blend beautifully with your hair because the knots are small and discreet.
Step 5: Styling and Blending
After applying Tape-In Extension or brazilian knot hair extensions, the next step is blending. Use a flat iron or curling iron to style your hair as usual. This helps merge your natural hair with the extensions seamlessly.
Trim the ends if necessary to remove any uneven layers. This step ensures that the extensions look like part of your natural hair rather than separate pieces.
Step 6: Caring for Your Extensions
Proper care is essential to keep your Tape-In Extension and brazilian knot hair extensions looking great:
- Avoid washing your hair too frequently. Two to three times a week is usually sufficient.
- Use sulfate-free shampoos and conditioners. Sulfates can weaken the adhesive on tape-ins and loosen the knots on brazilian knot extensions.
- Brush gently with a soft-bristle or loop brush. Start from the tips and work your way up to prevent pulling.
- Avoid applying heat directly to tape-in adhesives.
- Schedule regular maintenance. Tape-ins need to be reapplied every 6–8 weeks, and brazilian knot extensions may need tightening or repositioning every few months.
Step 7: Removing Extensions
When it’s time to remove your extensions:
- Tape-In Extension: Use a tape remover solution to dissolve the adhesive. Gently pull apart the extension and your hair.
- Brazilian Knot Hair Extensions: Carefully untie the knots using a professional loop tool or visit a stylist. Avoid pulling, as this can damage your natural hair.
Always follow proper removal techniques to protect your natural hair and allow for future applications.
Conclusion
Applying Tape-In Extension and Brazilian knot hair extensions may seem intimidating at first, but by following these simple steps, you can achieve beautiful, natural-looking hair with confidence. Start with clean, detangled hair, section properly, and apply each type carefully. Blend and style for a seamless finish, and don’t forget to care for your extensions to maximize their lifespan.