


Introduction
You’ve just found the perfect image—maybe a family photo, a logo, or a hand-drawn sketch—and you can already picture it stitched onto a hat, bag, or jacket. There’s just one problem: your Brother embroidery machine can’t read JPG files. To convert JPG to PES, you’ll need that special embroidery format that tells your machine exactly where to stitch.
The process to convert JPG to PES might sound complicated, but it doesn’t have to be. With the right tools and techniques, you can turn almost any image into a stitch-ready design. In this guide, we’ll walk you through the entire process to convert JPG to PES successfully, from choosing the right software to optimizing your design for flawless embroidery.
Whether you’re a beginner looking to convert JPG to PES for the first time or a seasoned embroiderer wanting better results, this guide will help you unlock the full potential of your Brother machine.
Why Convert JPG to PES?
Before we dive into the “how,” let’s talk about the “why.”
What’s a PES File?
A PES file is Brother’s proprietary embroidery format. It contains:
-
Stitch data: The exact path the needle should follow.
-
Color information: Which threads to use and when to change them.
-
Machine commands: Start/stop points, trim commands, and more.
Why Not Just Use a JPG?
Your embroidery machine doesn’t “see” images the way we do. A JPG is just a grid of pixels, while a PES file translates those pixels into stitches. Without conversion, your machine wouldn’t know where to start—or how to recreate the design in thread.
How to Convert JPG to PES: 3 Methods
There are several ways to turn a JPG into a PES file, each with its own pros and cons. Here are the top three methods:
1. Auto-Digitizing Software (Best for Beginners)
Auto-digitizing tools do most of the work for you. Simply upload your JPG, tweak a few settings, and let the software generate a PES file.
Top Picks:
-
Brother’s PE-Design (Made specifically for Brother machines)
-
SewArt (Affordable and beginner-friendly)
-
Embrilliance Essentials (Great for simple designs)
Pros:
✔ Fast and easy
✔ No manual tracing required
✔ Good for simple designs
Cons:
✖ Struggles with complex images
✖ May require cleanup
2. Manual Digitizing (Best for Professionals)
For the highest-quality results, manual digitizing lets you control every stitch. This method is ideal for logos, intricate designs, or images with fine details.
Tools for Manual Digitizing:
-
Wilcom Hatch (Industry-standard software)
-
PulseID (Great for advanced users)
-
Ink/Stitch (Free alternative for Inkscape users)
Pros:
✔ Perfect stitch placement
✔ Full creative control
✔ Works for any design
Cons:
✖ Steeper learning curve
✖ Time-consuming
3. Online Converters (Quick & Easy, but Limited)
If you need a fast solution, online tools can convert JPG to PES in minutes. Just upload, convert, and download.
Popular Options:
-
Online-Convert.com
-
Embroidery.com’s converter
-
Convertio
Pros:
✔ No software installation
✔ Instant results
Cons:
✖ Lower quality
✖ Limited customization
Step-by-Step: Converting JPG to PES
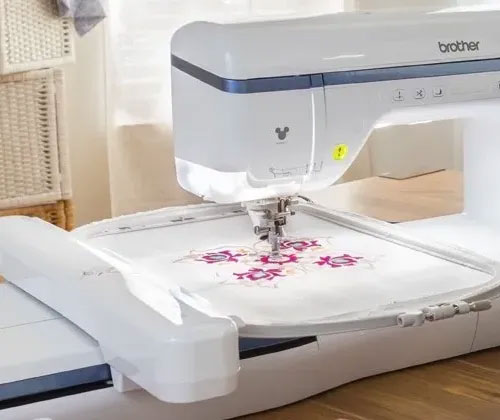
Let’s walk through the process using Brother’s PE-Design (one of the most user-friendly options for Brother machines).
Step 1: Prepare Your JPG
-
Use a high-contrast image (dark lines on a light background work best).
-
Remove unnecessary details or clutter.
-
Crop to focus on the main design.
Step 2: Import into PE-Design
-
Open PE-Design and select “New Design.”
-
Click “Import Image” and choose your JPG.
Step 3: Auto-Digitize
-
Select “Auto-Digitize” from the toolbar.
-
Adjust settings (stitch type, density, underlay).
-
Click “Apply” to generate the PES file.
Step 4: Clean Up & Refine
-
Use the “Edit Stitches” tool to fix any gaps or jumps.
-
Adjust thread colors if needed.
Step 5: Save as PES
-
Go to File > Save As.
-
Choose PES as the format.
-
Transfer to your Brother machine via USB or direct connection.
Pro Tips for Perfect Embroidery
Even with the best software, some designs need extra TLC. Here’s how to avoid common pitfalls:
✔ Simplify Complex Images
-
Too many details? Reduce colors and merge shapes.
-
Use vector tracing (like in Adobe Illustrator) before converting.
✔ Optimize Stitch Density
-
Low density = lighter, more flexible designs.
-
High density = fuller coverage (but may stiffen fabric).
✔ Test Before Stitching
-
Always run a test stitch on scrap fabric.
-
Check for thread breaks, tension issues, or misaligned stitches.
Troubleshooting Common Problems
❌ Design Looks Pixelated
-
Fix: Start with a higher-resolution JPG (300 DPI or more).
❌ Stitches Are Too Dense
-
Fix: Lower the stitch density in your software.
❌ Thread Breaks Frequently
-
Fix: Adjust tension settings or use a stabilizer.
Free Alternatives for Budget-Friendly Options
If you’re not ready to invest in premium software, try these free/workaround methods:
1. Ink/Stitch (Free Plugin for Inkscape)
-
Converts vector paths to stitches.
-
Great for simple designs.
2. MyEditor (Brother’s Free Basic Software)
-
Limited but works for small edits.
3. Manual Tracing in Free Programs
-
Use GIMP (free Photoshop alternative) to clean up images first.
When to Hire a Professional Digitizer
Some projects are better left to experts. Consider outsourcing if:
-
Your design has fine details or gradients.
-
You need multiple sizes or formats.
-
You’re working with complex artwork or text.
Where to Find Digitizers:
-
Fiverr (Affordable freelancers)
-
Etsy (Specialized embroidery services)
-
Local embroidery shops
Conclusion
Converting JPG to PES doesn’t have to be a mystery. With the right tools—whether it’s auto-digitizing software, manual tracing, or even free online converters—you can turn any image into a beautiful embroidered design for your Brother machine.
Recap of Key Steps:
-
Choose your method (auto-digitizing, manual, or online).
-
Clean up your JPG for best results.
-
Test and refine before stitching the final piece.
Now that you know the process, why not try it yourself? Pick a simple image, fire up your software, and start creating custom embroidery designs today.
Final Tip: Brother offers free trials for PE-Design—download it and practice before committing. Happy stitching!