

Introduction
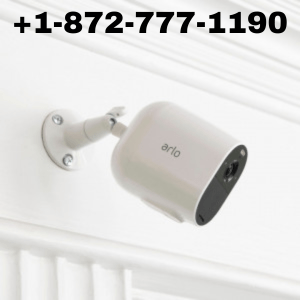
Arlo security systems are popular for their reliability, advanced features, and ease of use. Whether you’re a homeowner or a business owner, setting up your Arlo Base Station correctly is crucial to maximize the performance of your cameras. This guide will provide a detailed, step-by-step process to set up the Arlo Base Station VMB3000 and VMB4000, ensuring your system runs smoothly.
If you need professional assistance, you can contact our support team at +1–872–777–1190 or (833).800.3030 for guidance.
What is an Arlo Base Station?
The Arlo Base Station is the central hub that connects your Arlo cameras to your Wi-Fi network. It handles communication between the cameras and the Arlo app, provides cloud storage access, and enables features like motion alerts, sirens, and more. The VMB3000 and VMB4000 models are specifically designed to support multiple cameras, ensuring seamless security coverage.
What You’ll Need Before Starting
Before setting up your Arlo Base Station, make sure you have:
- Arlo Base Station (VMB3000 or VMB4000)
- Power adapter and Ethernet cable
- Wi-Fi router or modem
- Active internet connection
- Arlo cameras
- Smartphone or computer with the Arlo app installed
Having these ready will make the installation process smooth and quick.
How to Set Up Arlo VMB3000 and VMB4000 Base Station Easily
Step 1: Connect the Base Station
- Plug in the Arlo Base Station using the supplied power adapter.
- Connect the base station to your Wi-Fi router using the Ethernet cable.
- Wait for the LED light on the front of the base station to blink amber. This indicates that it is powered on but not yet connected.
Tip: Ensure your base station is placed in a central location in your home or office for optimal coverage.
Step 2: Download and Install the Arlo App
- Open the App Store (iOS) or Google Play Store (Android).
- Search for “Arlo” and download the official app.
- Create an Arlo account or log in if you already have one.
Having the app installed is essential, as all camera settings, firmware updates, and alerts are managed through it.
Step 3: Add the Base Station to Your Arlo Account
- Open the Arlo app.
- Tap on “Add Device” and select “Base Station”.
- Follow the on-screen instructions to sync your base station.
- When prompted, press the Sync button on your base station.
- Wait for the LED to turn solid green, indicating successful connection.
Pro Tip: If the connection fails, restart both the base station and your router, then try again.
Step 4: Connect Your Cameras
- Once the base station is connected, tap “Add Camera” in the app.
- Choose the camera model and follow the prompts.
- Press the Sync button on the camera.
- The camera LED will blink blue while syncing. When it turns solid green, your camera is ready.
- Repeat for additional cameras.
This process ensures that each camera is properly paired with the base station for reliable performance.
Step 5: Update Firmware
After adding your cameras, it’s important to update the firmware:
- Open the Arlo app.
- Navigate to Settings > My Devices > Base Station/Cameras > Firmware Update.
- If an update is available, tap Update.
- Wait for the update to complete; do not unplug the devices during this process.
Firmware updates improve security, add new features, and enhance device performance.
Step 6: Configure Settings
Now that your base station and cameras are set up, you can configure settings for optimal security:
- Motion Detection Zones: Adjust areas where motion is detected to avoid false alerts.
- Notifications: Enable push notifications or email alerts when motion is detected.
- Cloud Storage: Ensure your plan allows for sufficient storage of video recordings.
- Arlo Siren: Test and set the siren volume for maximum effectiveness.
Configuring these settings ensures that your Arlo system works exactly how you need it.
Step 7: Test Your System
Before relying fully on your Arlo security system:
- Open the Arlo app.
- Test each camera’s live feed to ensure video quality is clear.
- Trigger motion alerts to confirm that notifications are working.
- Activate the siren to ensure it responds appropriately.
This final step guarantees your system is ready to protect your home or business.
Troubleshooting Common Issues
Even with a simple setup, you might encounter some issues:
- LED Light Not Turning Green: Check power connections and ensure the Ethernet cable is properly connected.
- Camera Not Syncing: Move the camera closer to the base station, then try syncing again.
- No Notifications: Verify that your phone settings allow push notifications from the Arlo app.
For more complex issues, professional assistance can be invaluable. Call +1–872–777–1190 to speak with an expert who can guide you through troubleshooting and setup.
Additional Tips for Optimal Performance
- Central Placement: Place the base station in a central location to maximize camera range.
- Avoid Obstacles: Keep the base station away from metal objects and large appliances that may interfere with signal.
- Regular Updates: Regularly check the Arlo app for firmware updates to ensure your system remains secure.
- Backup Internet: Consider a secondary internet connection to maintain monitoring during outages.
Following these tips will enhance the reliability and longevity of your Arlo security system.
Why Professional Support Can Help
While Arlo is designed for user-friendly installation, sometimes setup issues or complex home networks can complicate things. Professional technicians can:
- Set up your base station and cameras quickly
- Configure motion zones and notifications
- Optimize Wi-Fi connectivity for seamless performance
- Provide ongoing technical support
Call +1–872–777–1190 for professional assistance if you encounter any difficulties.
Conclusion
Setting up the Arlo Base Station VMB3000 or VMB4000 is a straightforward process when you follow the proper steps. From connecting the base station and syncing cameras to configuring alerts and testing your system, each step ensures your Arlo security system operates efficiently.
By placing the base station in an optimal location, regularly updating firmware, and configuring settings correctly, you can enjoy reliable home or business security. For hands-on assistance, don’t hesitate to contact +1–872–777–1190 to get expert help with setup and troubleshooting.
Your peace of mind is just a few steps away with Arlo’s advanced, user-friendly security technology.