


Introduction:
When it comes to sharing learning material with your employees. using static images and text may not have the desired impact. But what if you could enhance your presentations with audio or video narration? By adding narration, you can significantly boost engagement and improve learning outcomes. With the help of iSpring Suite and an authoring toolkit integrated with PowerPoint, you can easily create interactive and self-study courses. In this article, we’ll guide you through the process of recording, editing, and adding narrations to your PowerPoint slides.
Recording an Audio Narration for PowerPoint:
To start recording audio narration, ensure your microphone is properly connected to your PC. Once you’re ready, follow these steps:
- Open your PowerPoint presentation and click the “iSpring Suite” tab on the toolbar.

- Click the “Record Audio” button at the top-left corner to start recording.

- Choose the slide you want to synchronize with the narration.
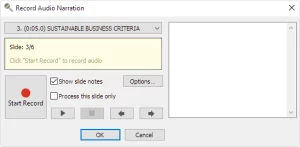
Use the built-in slide notes to paste your script or record the audio for a single slide. Click the “Start Record” button and begin your narration. You can pause and continue recording as needed. When finished, click “Stop” and then “OK” to save your audio narration.
Recording a Video Narration for PowerPoint:
Creating video narrations can further enhance your presentations. Follow these steps to record video narrations:
Refer to a guide on creating presenter-style training videos for effective presentations.
- Open your Power/Point presentation and click the “Record Video” button in the iSpring Suite toolbar.

- Use the slide notes to add the script for your video narration or record video for a single slide.
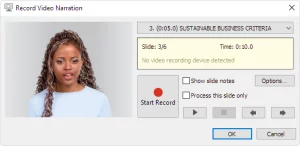
Click “Start Recording” to begin your video narration. Synchronize it with the presentation’s animations and effects. Click “Stop” and then “OK” when you’re done recording.
Adding a Pre-recorded Narration to PowerPoint:
If you have pre-recorded audio or video files, you can easily import them into your presentation:
- Click the “Manage Narration” button on the iSpring Suite ribbon.

- In the Narration Editor, you’ll see a timeline of slides and audio/video. Place your cursor where you want to start the narration.
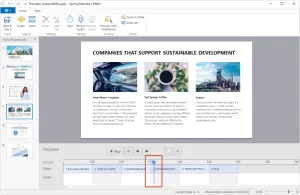
- Click “Audio” or “Video” on the Narration Editor ribbon and select the files you want to import.
- Specify whether to insert the files at the current cursor position or at the beginning of the selected slide.
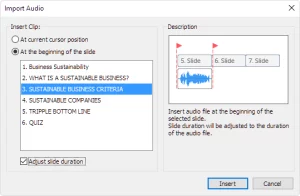
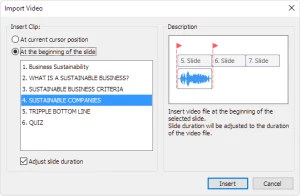
- iSpring Suite automatically saves imported files in the presentation resource folder.
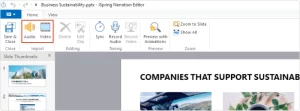
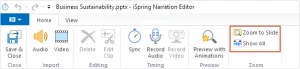
Editing a Narration in PowerPoint:
To fine-tune your narrations, use the Narration Editor in iSpring Suite:
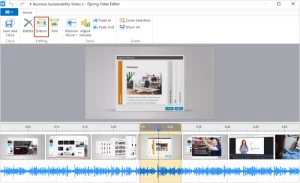
- The timeline in the Narration Editor displays the sequence of clips and slides.
- Adjust the duration of slides by moving their borders. Hold the Shift button while dragging a border to move it independently.
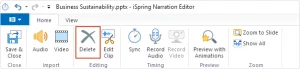
- To delete a clip, select it on the timeline and press Delete on your keyboard.
- To replace a clip, right-click on it and choose “Change Audio/Video Clip” from the drop-down list.
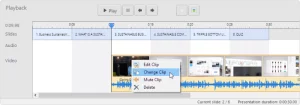
- To delete a specific portion of your narration, click and drag to select that part and press the Delete button.
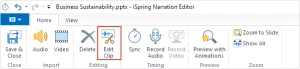
- iSpring Suite has a built-in Audio/Video Editor that allows you to add silence, trim clips, remove noise, or use fade effects — all of which can be applied to both audio and video files. and with the exception of adding silence. To access the Audio/Video Editor, select the desired clip on the timeline and click the Edit Clip button on the toolbar.
- To insert silence into a portion of your audio narration, place the cursor at the beginning of the portion you wish to mute, then click the Silence button on the ribbon. Specify the duration of the silence and click OK.
- Narrators will often place an extra second or two of silence at the beginning and/or end of a narration. If the silent portions seem unnaturally long, you can easily trim them off. To do this, select the part of your audio/video narration that you want to keep, and then click the Trim button on the toolbar. The sections of your audio/video clip that are outside the selected area will be removed.
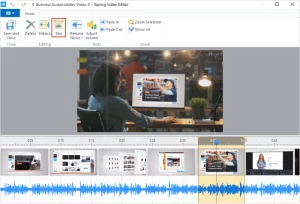
- If you notice background noise in your audio or video narration, you can easily get rid of it using the relevant option in iSpring Suite. Select the noisy part of your narration, click Remove Noise on the toolbar, and in the open window, confirm this by clicking Remove Noise.
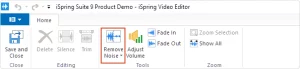
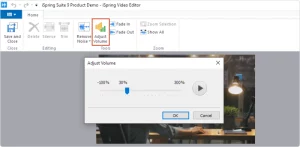
- If the audio or video you inserted is too quiet or too loud, no problem! Click the Adjust Volume button on the toolbar and increase or decrease the clip’s volume in the open window.
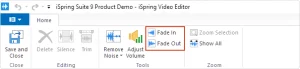
- To create a seamless transition from one part of your narration to another, set fade effects. Select the part of your clip that you wish to fade and then click the Fade In / Fade Out buttons on the toolbar.
Conclusion:
By following these simple steps, you can easily add audio and video narrations to your PowerPoint presentations using iSpring Suite. With narrations, you’ll create engaging and effective learning experiences for your audience, making your presentations more impactful and memorable. Start adding narrations today and take your PowerPoint presentations to the next level!