

The Joy of a Perfect Pedicure
Picture this: You, comfortably seated, a warm soak for your feet, followed by gentle exfoliation, meticulous nail care, and a relaxing massage. This isn’t a spa visit; this is your home, your sanctuary, where you master the art of DIY pedicures. In this guide, we unveil the secrets to a perfect pedicure, transforming your self-care into a blissful rejuvenating ritual.
Our feet, often neglected, carry us through our busy lives and deserve to be pampered. A pedicure is not just about beauty; it’s about giving your feet the care they need. From soaking in warm water to removing dead skin and shaping the nails, a pedicure can leave your feet looking and feeling their best. So, let’s embark on this journey of foot pampering and unveil the secrets of a DIY pedicure.
I. Setting the Stage: Creating Your At-Home Spa
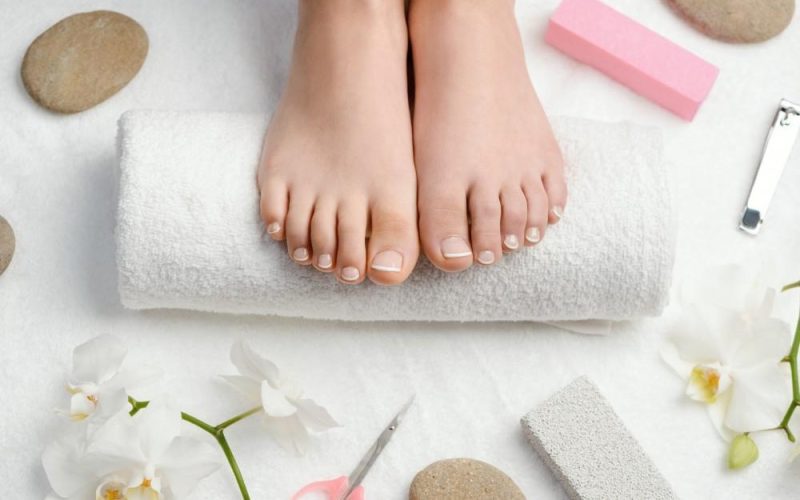
Gathering Your Pedicure Toolkit
The first step to a perfect DIY pedicure is gathering the essential tools. Creating an at-home spa-like experience requires a few key items:
- Foot soak basin: A shallow basin to soak your feet in warm water, often with added salts or oils for relaxation.
- Nail clippers: To trim nails to the desired length.
- Nail file: For shaping and smoothing the edges of your nails.
- Cuticle pusher: To gently push back the cuticles for a clean nail bed.
- Pumice stone or foot scrub: For removing calluses and dead skin.
- Moisturizing lotion: To hydrate and nourish your feet after the treatment.
- Nail polish and topcoat: For a polished finish if desired.
II. Soak Away the Stress: Prepping Your Feet
The Therapeutic Foot Soak
Start your pedicure by preparing a soothing foot soak. Fill the foot soak basin with warm water and add a tablespoon of Epsom salt and a few drops of your favorite essential oil. The Epsom salt helps in relaxing muscles and softening the skin, while the aroma of the essential oil adds to the overall calming experience.
Soak your feet for about 15-20 minutes. This relaxes your muscles, softens your skin, and prepares your feet for the exfoliation step.

III. Exfoliate and Renew: Say Goodbye to Dead Skin
Scrubbing Your Way to Silky Smooth Feet
Exfoliation is a crucial step in any pedicure. After soaking, use a foot scrub or pumice stone to remove dead skin and calluses. Gently scrub your heels, the balls of your feet, and around your toes. Pay extra attention to rough areas.
You can make a simple foot scrub at home using ingredients like sugar or salt, olive oil, and a few drops of essential oil. This not only exfoliates but also moisturizes your feet.
IV. Nail Care 101: Shaping and Polishing
Trimming, Shaping, and Beautifying Your Nails
Now that your feet are soft and smooth, it’s time to focus on your nails. Trim your nails straight across to prevent ingrown nails. Use a nail file to shape them as per your preference. Smooth the edges to avoid any roughness.
If you like, you can apply a base coat, followed by your desired nail polish color, and finish with a topcoat for a glossy finish. Allow your nails to dry completely before moving on.
V. The Massage Magic: Relieving Tension and Stress
Soothing Your Soles with a Relaxing Massage
A foot massage is the epitome of relaxation during a pedicure. Use a moisturizing lotion or oil and gently massage your feet, focusing on the arch, heels, and toes. Use your thumbs to apply pressure and knead any tense areas.
Massage not only relaxes your muscles but also improves blood circulation and provides a sense of relief and tranquility.
VI. Seal the Deal: Nourishment and Hydration
Moisturizing and Nourishing Your Feet
Finish your DIY pedicure by generously applying moisturizing lotion to your feet and legs. Massage it in, ensuring your skin absorbs the moisture. Concentrate on the heels and any dry areas.
This step helps in locking in the moisture, leaving your skin soft, supple, and thoroughly nourished.
VII. Finishing Touches: Expert Tips for a Professional Look
Polishing Your Pedicure Skills
To maintain your pedicure, moisturize your feet daily to prevent dryness. Also, regularly trim and file your nails to maintain their shape. Consider a pedicure every 2-4 weeks for optimal foot care.
Now, sit back, relax, and admire your beautifully pampered feet. You’ve successfully mastered the art of a DIY pedicure, turning it into a rejuvenating ritual.
Conclusion: Treat Your Feet, Embrace the Joy
A DIY pedicure isn’t just about the aesthetics; it’s an act of self-care and appreciation for your hardworking feet. As you indulge in this pampering session, you not only enhance the appearance of your feet but also give them the care and attention they deserve.
Gather your tools, create a tranquil atmosphere, and follow the steps outlined in this guide to achieve a perfect pedicure in the comfort of your home. Treat your feet, embrace the joy of a DIY pedicure, and let the rejuvenation begin.