Introduction: Quick Photoshop Touch-Up Tricks
In today’s visually driven world, where every click and tap is an opportunity to create lasting impressions, the quality of your photos can make or break your content. Enter Adobe Photoshop, the trusted companion of millions of photographers worldwide. While it offers a plethora of features for in-depth editing, sometimes you just need to make quick enhancements. That’s where this article comes in, as we unveil four of our favorite Photoshop tools that will help you effortlessly elevate your photos. Whether it’s removing blemishes, adjusting levels, or cloning parts of an image, we’ve got you covered.
1. Healing: Vanish Blemishes with Ease
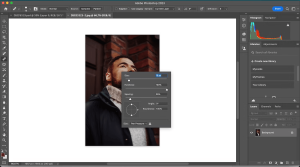
Healing Brush is your go-to tool when you want to eliminate blemishes, spots, or imperfections from your photos seamlessly. Here’s how to use it:
- Open Photoshop: Launch Adobe Photoshop on your computer.
- Locate the Healing Brush: Look for the Healing Brush tool in the left-hand toolbar. It typically looks like a band-aid icon.
- Select the Healing Brush: Click on the Healing Brush tool to activate it.
- Choose a Sample Area: Identify a clean and similar area of the picture that you want to use for “healing” other areas. Press and hold the Alt (or Option) key while clicking on this clean area. This sets the source for your healing.
- Customize Brush Size: Adjust the brush size to match the area you’re retouching by using the brush size slider. You can make it larger or smaller depending on the size of the blemish or imperfection.

Image by https://www.makeuseof.com/ - Start Healing: Now, simply start brushing over the parts of your image where you want to remove imperfections. As you paint over them, the Healing Brush will blend the sampled area with the target area, making the blemish disappear.
2. Spot Healing: A Swift Solution
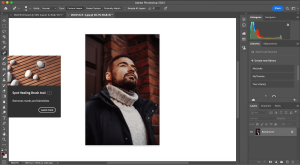
If you prefer a quicker method for removing imperfections without the need for precise brushwork, the Spot Healing tool is your solution. Here’s how to use it:
- Open Photoshop: Begin by launching Adobe Photoshop on your computer.
- Access the Spot Healing Tool: In the left-hand toolbar, you’ll find the Spot Healing tool, located just above the Healing Brush.
- Select Spot Healing: Click on the Spot Healing tool to activate it.
- Start Healing: With Spot Healing, you don’t need to manually select a sample area. Simply click on the imperfections or blemishes you want to remove. Photoshop will automatically analyze the surrounding pixels and make corrections.

Image by https://www.makeuseof.com/ - Immediate Results: The changes take effect instantly, making it a speedy option for quick touch-ups.
3. Changing Input and Output Levels: Master the Light and Shadows
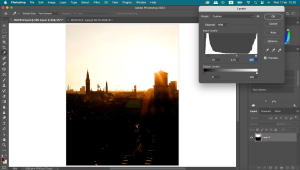
Photoshop isn’t just about the finishing touches; it can also help you make fundamental adjustments to the lighting and shadows in your photos. Here’s how to use the Levels Adjustment feature:
- Access Levels Adjustment: At the top of your Photoshop screen, navigate to the menu and select “Adjustments” and then “Levels.”
- Adjust Shadows, Midtones, and Highlights: In the Levels adjustment window, you’ll see sliders for shadows, midtones, and highlights. Drag these sliders to brighten or darken the respective areas in your image. This provides fine-tuned control over the tonal range of your photo.
- Output Levels: In addition to input levels, you can also adjust the output levels using a separate slider. This lets you control the brightness and contrast of your image effectively.
- Apply Changes: Once you’ve made the desired adjustments, click on the “OK” button to apply them to your photo.

Image by https://www.makeuseof.com/
This feature allows you to make significant enhancements to the lighting and tonal balance of your images, helping you achieve the desired mood and atmosphere.
4. Clone Stamp: Artful Cloning
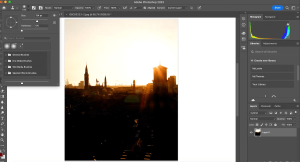
Sometimes, photo editing isn’t just about fixing imperfections; it’s about creatively replicating elements within an image. The Clone Stamp tool is perfect for this purpose. Here’s how to use it:
- Access the Clone Stamp Tool: Find the Clone Stamp tool in the left-hand toolbar of Photoshop.
- Adjust Brush Size: If needed, change the size of the clone stamp brush using the option at the top of your screen. This allows you to control the area you’ll clone.
- Select the Source Area: Press and hold the Alt (or Option) key, then click on the part of your image that you want to clone. This sets the source for cloning.
- Start Cloning: Now, click on the area where you want to replicate the selected source. Photoshop will copy the pixels from the source area to the target area, effectively cloning it.

Image by https://www.makeuseof.com/
The Clone Stamp tool is great for tasks like removing unwanted objects, duplicating elements, or even creating artistic effects by blending different parts of an image.
| Tool | Purpose | How to Use It |
|---|---|---|
| Healing Brush | Remove blemishes, spots, and imperfections | 1. Open Photoshop 2. Select Healing Brush tool 3. Choose a sample area 4. Customize brush size 5. Start healing |
| Spot Healing | Swiftly remove imperfections | 1. Open Photoshop 2. Select Spot Healing tool 3. Start healing by clicking on imperfections |
| Levels Adjustment | Fine-tune lighting and shadows | 1. Access Levels Adjustment 2. Adjust shadows, midtones, and highlights sliders 3. Control output levels 4. Apply changes |
| Clone Stamp | Clone and replicate elements within an image | 1. Access Clone Stamp tool 2. Adjust brush size if needed 3. Select a source area by pressing Alt (or Option) 4. Start cloning by clicking where you want to replicate |
This table provides readers with a quick reference guide to the tools discussed in the article, their purposes, and a brief overview of how to use them effectively for enhancing photos in Photoshop.
Conclusion
Adobe Photoshop is a powerhouse of creative tools, and these quick touch-up tricks are your gateway to making your photos shine brighter than ever. Whether you’re a seasoned photographer or just getting started, mastering these techniques will undoubtedly level up your photo-editing game. Remember, it’s not always about how much you edit but how effectively you do it. So, open up Photoshop and give these tools a try; your photos will thank you for it.


