Introduction: Printer Communication Issues
Encountering an error message like “Communication Not Available” while attempting to print can be incredibly frustrating, especially when using popular printer brands like Dell, HP, Lexmark, and others. If you are currently facing this issue and searching for a solution, you’ve come to the right place. In this article, we will provide you with effective troubleshooting methods to resolve printer communication issues on Windows. By implementing these solutions, you should be able to overcome the error message and enjoy smooth printing once again.
Reboot Your Printer and Computer
One of the simplest yet effective solutions is to turn off your printer and reboot your computer. After the restart, turn on your printer again. This process can sometimes act as a quick trick to resolve communication problems between your printer and computer. The act of rebooting both devices can help establish a fresh connection and clear any temporary communication glitches.
Stop and Start the Windows Print Spooler
The Windows Print Spooler is a critical service that manages print jobs and communication between your computer and printer. Restarting this service might address the “Communication Not Available” error. Follow these steps to stop and start the Windows Print Spooler:
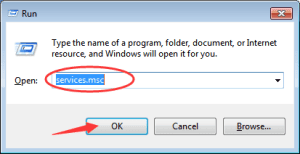
Press the Windows key and the R key (Win+R) simultaneously. This action will open the Run dialog box.
In the Run dialog box, type “services.msc” and press the OK button.
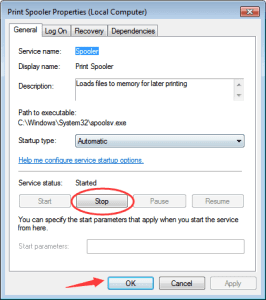
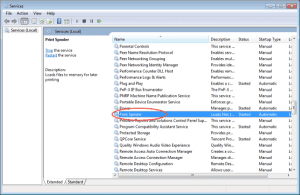
Locate “Print Spooler” from the list of services, and double-click on it to open the Properties dialog box.
In the “General” tab, click the Stop button to disable the service temporarily and then click OK.
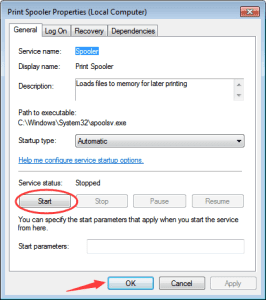
Now, reopen the Properties dialog box for Print Spooler, click the Start button, and then click OK to enable the service again.
Uninstall Printer and Update the Driver
A corrupted or outdated printer driver can often lead to communication problems. To address this, try updating the printer driver after uninstalling the existing one. Follow these steps to uninstall the printer and update the driver:
Disconnect the printer from your computer.
Press Win+R (Windows key and R key) simultaneously to open the Run dialog box.
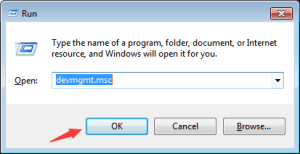
Type “devmgmt.msc” in the Run box and press OK to open the Device Manager.
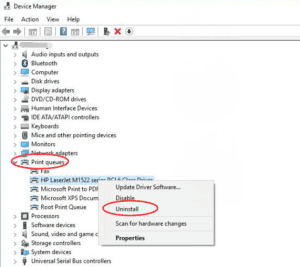
Locate your printer in the list of devices, usually found under the category “Print queues.”
Right-click on the printer device name and select “Uninstall” from the context menu. (If your printer has a Fax function, uninstall the Fax before uninstalling the printer.)
Restart your PC to apply the changes.
Reconnect the printer, and visit the printer manufacturer’s website to download the latest driver for your specific printer model and operating system.
If you find manual driver downloading challenging, consider using Driver Easy, a software tool that can detect problem drivers on your computer and provide a list of new drivers. With Driver Easy, you can update the printer driver quickly and efficiently.
For printers connected via a USB port, you can also follow these steps: a. Open Device Manager. b. Expand the “Universal Serial Bus controllers” branch. c.
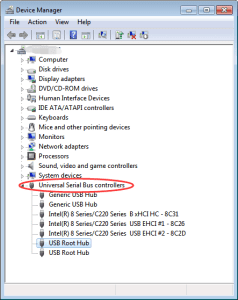
Double-click on the “USB Root Hub” device, and click the “Power Management” tab. (Repeat for each USB Root Hub device if there are multiple.) d.
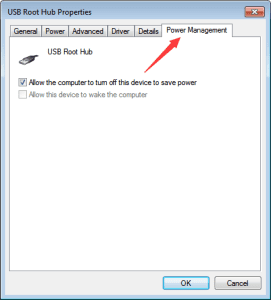
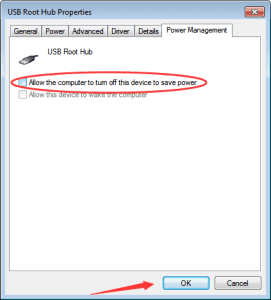
Disable the “Allow the computer to turn off this device to save power” option and click OK. e. Reboot the computer.
Conclusion:
By following the solutions outlined in this article, you should be able to troubleshoot printer communication issues in Windows effectively. Whether it’s rebooting your devices, restarting the Windows Print Spooler, or updating the printer driver, these methods have proven to be helpful in resolving the “Communication Not Available” error. Ensure that you follow the steps carefully and have the latest printer driver installed to ensure smooth and uninterrupted printing experiences.


