

Introduction
Both in offices and academic settings, printing is of utmost importance, Moreover, macOS offers multiple approaches for adding and configuring network printers. This guide will explain how to install a network printer on your macOS device. Self Service or manual setup are both options for completing this task. Furthermore, our discussion will include helpful troubleshooting tips to resolve everyday printing problems on macOS.
Requesting Access to a Network Printer
Make sure to check before starting the printer installation, confirm that you possess the required access privileges for the printer. Active Directory groups oversee the management of network printers. In case you haven’t been included in the relevant group, Self Service may not display the printer. To request access to a network printer on University-managed devices, complete the Printer Access Request form or seek assistance from Technology Help.
Adding a Network Printer is Best Done Using Self Service
For devices centrally managed by the university, Adding printers is made easy through the Self Service application, eliminating the need for an admin account or any extra configuration. Follow these steps to add a network printer using Self Service:
Choose the Apple menu situated in your computer’s toolbar, Afterward, choose Applications.
Gain entry by providing the necessary information for your internet ID.
Access the Browse menu situated on the left side of your screen and click on Printing and select Printing.
The window will display a list of available printers on its right side. will appear on the right side of the window.
Select the Install option adjacent to the printer(s) you desire to add to your computer.
A rotating circle will be displayed, You’ll get a notification labeled Done when the printer has been installed successfully.
Manually Adding a Network Printer
Should your macOS device lack central management or if you favor doing things manually, you can add a network printer through the macOS system settings. Follow these steps:
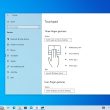
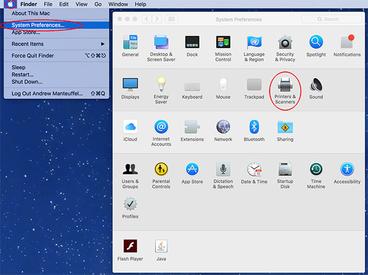
Access System Preferences > Printer and Scanner preferences.
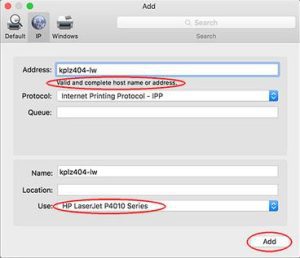
Press the “+” symbol to install a printer.
The available printers on your local network will be shown in a list. will be displayed.
Should you not see the desired printer,, try adding it manually using its IP address.
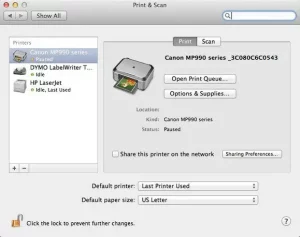
After successfully adding the printer, it is possible to designate it as the default printer for your Mac
Troubleshooting Printing Problems on macOS
Printing problems can be frustrating, but many issues can be resolved with some basic troubleshooting steps:
Make sure the printer has been properly connected to your Mac. and activated.
Verify that your Mac and the printer are both linked to the same network.
Make sure the printer has sufficient ink or toner, Check for any paper jams.
Review the printer’s documentation for further troubleshooting In case of printer malfunctioning, try these alternative methods to fix it..
Following these steps should help you Setting up a network printer on your macOS device and fixing typical printing problems is possible by performing these actions. Should you face recurring difficulties, contact the printer producer for support or request aid from your organization’s IT team.