


Introduction
If you want to create the custom stamps on your Mint machine, you have to use Silhouette Mint Studio. Your first step is going to the official site and downloading Silhouette Mint Studio before its use. If you want to get the latest one download from the Silhouette Mint Studio Download section. You can then become an artist and make unique stamps after you install Mint Studio Software. This is in the form of text, images and imported elements.
It is easy to alter the size, place, and angle of your design. Once you are done with your design, open your stamp onto the mint machine to print your custom stamp. Creating stamps can never be hectic and boring with Mint Studio.
Process of using Silhouette Mint Studio Step-by-Step
Below is the step by step procedure of using a Silhouette mint studio:
Step 1: Download and Install the Software
Your first step is to visit Silhouette America website and download Silhouette Mint Studio software. If an installation CD is not there, searching for Silhouette Mint Studio download on the internet will give you the latest version corresponding to your operating system. After downloading:
- Run the installer file.
- Complete the installation process by following the instructions on your screen.
- If you are using Windows, you are able to survive a ‘new hardware wizard’ when connecting your Mint machine. Give permissions to the Windows wizard to install all drivers required.
Steps above make your software ready to be in use with your connected Mint machine.
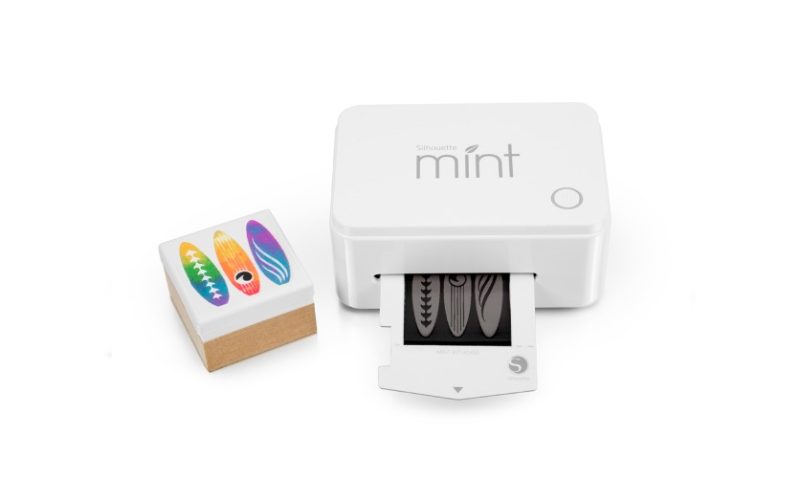
Step 2: Connect Your Silhouette Mint Machine
Once the software is installed:
- Connect your Silhouette Mint into an outlet.
- Join your Mint machine and your computer with the help of the USB cable provided in the box.
- Turn on the Mint machine by simply pressing its power button to turn it on.
Your computer will detect the device and the Mint Studio Software is ready for use once your computer detects the gadget.
Step 3: Find Out About the Interface Features of the Mint Studio Software
Double -click the desktop icon to begin your Mint Studio. You can also look for it in the application folder. The interface has:
- It is an area where you can create a stamp and see it too.
- With these you can insert text, different shapes and different images.
- Under the piston setting panel, you have the option to select the size of your piston.
- The filter options allow you to see how your piston appears when you are printed in black and white.
Since the software has a user -friendly interface, even beginners think it is easy to use.
Step 4: Design Your Custom Stamp
Using Mint Studio you can create your stamp by:
- Types of writings used in writing your text.
- Either you can upload images, or pre -made forms included in the software can be used.
- Changing the symmetry of your piston elements affects direction, size and position.
- Using the filters can enable you to visualize how your stamped work will appear.
Select the piston size under piston settings. This will make it match the selected stamp sheet. This step will ensure that your design is scaled properly before printing.
Step 5: Preview and Edit Your Design
Use the filter options before printing. You can then preview your design in black and white. You will be able to see exactly what your stamp will actually look like when it is stamped. You can adjust:
- Image contrast.
- Line thickness.
- General design clarity.
By editing these you can have a sharp stamp without errors when the piston is printed.
Step 6: When Your Image is Clear, Forward it to the Mint Machine for Printing
When your design turns out as expected, do the following:
- Hits the “Send to the Mint” icon on the toolbar.
- When the display indicates, insert a new stamp sheet in the Mint machine.
- The Mint will take the sheet and then print your stamp upside down.
The mint machine will print your design on a stamp sheet; hence your design stamp creation will be complete.
Step 7: Assemble Your Own Custom Stamp and Start Using It Once its Assembly
After printing:
- Remove the stamp sheet of the printing machine.
- Making sure that your printed stamp is attached to the stamp base is a measure of ensuring that it is available for use.
- When the ink is prepared it only takes a matter of using your new stamp to produce your impressions.
It is only by following the same process of stamp development you will be able to produce the numerous stamps of different designs, colors and sizes.
Getting the Full Benefits of Silhouette Mint Studio
So long as you are keen to have your stamps print perfectly clean, below are a few tips you can use to create clean stamps using the Silhouette Mint Studio.
- Keep Simple Designs: The less complex your design, the more a clean print is achieved. Designs with too much complexity may result in less than favorable outcomes.
- Use High Contrast: Be sure to have sufficient light and dark regions on your stamp, high contrast helps make the stamps clear and easily to be read. Lack of contrast in the image may lead to a washed out final photograph.
- Always Upgrade: Having the latest Mint Studio software means that you get the latest patches as well as design tools. The vast majority of updates serve to enhance features and remove software bugs, facilitating the smoother design and print processes.
- Using the internet: Search for videos and other sources which provide tutorials and innovative methods used in stamp designing. Exposure to materials available online expands creativity and ways of achieving the best results.
- Browse Collections and Courses Offered: Users do not have to worry about advanced education for the application since it is easy to learn. There are guides and courses posted on the internet.
The global market value for self-inking stamps with custom designs was around $400 million in the year 2024, and is projected to grow at a compounded annual growth rate of 5.5% until 2033. Market growth will benefit from an increasing demand for companies that provide custom stamp solutions.
Do follow these tips to have fun with the mint studio. Thereby, you will obtain clean, appealing stamps for all your projects. Remember that easier designs and significant software updates can increase your stamp projects.
Silhouette Mint Studio Features
| Feature | Description | Benefit |
| User Interface | Intuitive design workspace | Easy for beginners and pros |
| Design Options | Text, images, imported files | Versatile creative possibilities |
| Stamp Size Selection | Multiple stamp sizes are available | Perfect fit for various projects |
| Preview Filters | Black-and-white view of the stamp design | Ensures clear, crisp stamps |
| Direct Printing | Forward the design to the Mint machine directly | Streamlines the stamp creation process |
Familiarize Yourself with the Silhouette Mint Studio Software Interface
When the software is complete, the work area is nice and easy for all to use. When you launch Mint Studio, you have design mode displayed, which you utilize to create your stamp. Anyone can begin creating stamps, no matter level of experience.
1. Selecting the Proper Piston Size
The initial step of Silhouette Mint Studio is choosing the size of your piston. As the stamp sheet you have in the store corresponds to matching the right size, you need to make sure that your tools of design suit the appropriate measurements of the work room. Then, if the size is right, your design will be precisely the correct size for the stamp.
2. Adding Text to Your Design
You can then utilize the text tool to place text onto your stamp design. This enables you to input any form of message you want onto your stamp. You can make your text font, size, and style appear different in the Mint Studio. You can make your writing bold and italic or choose an artistic font. Therefore, your stamp will appear just as you wanted.
3. Inserting Images
You can also insert pictures onto your stamp design. The Silhouette Mint Studio allows you to include images on your computer into your project. In case you don’t have your photos, you can download them from the library using Mint Studio Software. You can use a great number of templates available to differentiate your stamp.
4. Adjusting Your Design Layout
You can move text and images wherever you want them once they are placed. Within the software, you can adjust both the size and rotation of anything within your design. It allows you to position all design elements so your stamp appears exactly as you desire.
5. Previewing Your Stamp
You can view your design using the accessible filters prior to printing. This black-and-white preview indicates how your stamp will appear once printed in a single color of ink. Utilizing this preview helps your design remain uncomplicated and ready for printing.
In order to start your stamp design, ensure that you get the Silhouette Mint Studio from the official website. Through the Mint Studio software, it is possible for anyone to experience a simple and enjoyable method of creating their personalized stamps.
Conclusion
Silhouette Mint Studio is critical software for customizing stamps to use with the Mint machine. Start by installing Silhouette Mint Studio on the official side – Search Silhouette Mint Studio Download to have the most updated version. Install it, then navigate the simple Mint Studio software to create individualized stamps in text, photo or import files. Edit size, design and positioning easily. After design, send it to your mint machine to print the custom stamp. Mint Studio makes piston creation easy and fun for all skill levels.
Unlock your creativity with Silhouette Mint Studio-Learn more here!