


Snipping Tools Not Working Issues
The Snipping Tools is a valuable tool for capturing screenshots on Windows operating systems. However, there are times when this handy tool refuses to cooperate, leaving users frustrated. If you’ve encountered the “Snipping Tool not working” error, don’t worry – we’ve got you covered with effective solutions to get it up and running again.
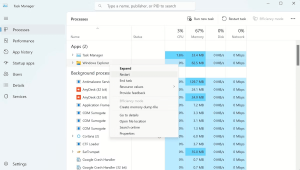
1. Restarting the Windows File Explorer
The Snipping Tools is closely tied to the File Explorer service, and if File Explorer becomes unresponsive, it can affect the functionality of the Snipping Tool. To address this, follow these steps:
Press Ctrl + Alt + Del and select Task Manager, or use the shortcut Ctrl + Shift + ESC to directly open the Task Manager.
Locate “Windows Explorer” in the task list, right-click it, and choose “Restart.”
During the restart, you might notice temporary changes in your desktop appearance, such as a disappearing taskbar and a black wallpaper. This is normal, as these elements rely on File Explorer.
After the restart, try launching and using the Snipping Tool to see if the issue is resolved.
2. Identifying Interfering Third-Party Software
At times, recently installed programs can clash with the Snipping Tool’s operation. To check if third-party software is causing the problem, follow these steps:
Type “system configuration” in the Start menu search bar and open the System Configuration panel.
Switch to the “Services” tab, and at the bottom, select “Hide all Microsoft services.”
Disable any services that could potentially interfere with the Snipping Tool.
If the Snipping Tool works after disabling a specific service, it’s recommended to keep that service disabled to maintain the tool’s

functionality.
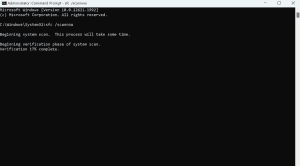
3. Running the Scannow Tool for Repairs
If other solutions don’t work, you can use the “scannow” command to repair damaged files affecting the Snipping Tool. Here’s how:
Search for “Command Prompt” in the Start menu, right-click it, and select “Run as administrator.”
In the Command Prompt, type “sfc /scannow” and press Enter to scan and repair system files.
Next, enter “snippingtool.exe” to launch the Snipping Tool manually.
Check if the Snipping Tool is now functioning properly.
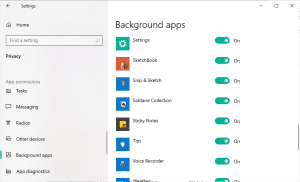
4. Permitting Snipping Tool to Run in the Background
The Snipping Tool may not work if it lacks permission to run in the background. To grant it the necessary authorization, follow these steps:
Click the Windows icon and select “Settings.”
Navigate to “Privacy” and then scroll down to “Background apps.”
Locate “Snip & Sketch” in the app list and ensure it’s toggled on.
This allows the Snipping Tool to function seamlessly even when you’re not actively using its window.
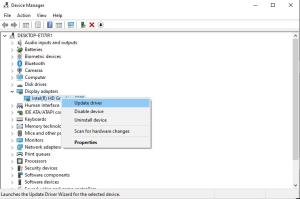
5. Updating Graphics Drivers for Compatibility
Outdated or corrupted graphics drivers can lead to compatibility issues with the Snipping Tool. To address this, update your graphics drivers:
Right-click the Windows icon and choose “Device Manager.”
Expand “Display adapters,” right-click your graphics driver, and select “Update driver” > “Search automatically for drivers.”
Allow the system to search for and install the latest drivers.
Restart your computer to apply the changes.
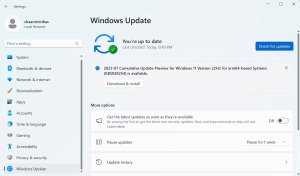
6. Keeping Your Windows Computer Updated
Regular Windows updates are crucial for resolving bugs and enhancing performance. If your Windows version is outdated, it could be causing Snipping Tool errors. To update your Windows version:
Press Windows Key + I to open Settings and select “Windows Update.”
Click “Download & install” if updates are available.
Allow the updates to install and restart your system.
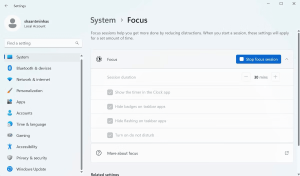
7. Disabling Focus Assist for Uninterrupted Functionality
Focus Assist, while helpful, can sometimes interfere with the Snipping Tool’s operation. To disable it, follow these steps:
Search for “settings” in the Start menu and select “System” > “Focus Assist.”
Toggle off the Focus Assist features.
Now try using the Snipping Tool to see if it works without interruptions.
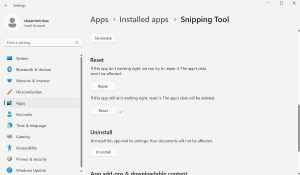
8. Resetting the Snipping Tool App
Apps can sometimes malfunction for unexplainable reasons. Resetting the Snipping Tool can restore it to its default settings:
Launch the Settings app and go to “Apps” > “Installed apps.”
Find the Snipping Tool, click “Advanced options,” and then click “Reset.”
Confirm the reset, and wait for the process to complete.
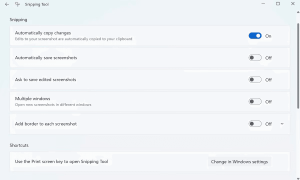
9. Enabling the Auto Copy Feature for Seamless Usage
If your screenshots aren’t automatically saved, the Snipping Tool’s Auto Copy feature might be disabled. To enable it:
Open the Snipping Tool and click the ellipses icon in the top-right corner.
Toggle on “Automatically save screenshots.”
10. Maximizing the Snipping Tool’s Potential
The Snipping Tool is an indispensable tool for communicating information through screenshots. Knowing how to effectively use its features, shortcuts, and hotkeys enhances your overall screenshot experience. Whether it’s capturing, editing, or saving screenshots, the Snipping Tool can be a powerful ally in your productivity arsenal.
In conclusion, encountering the “Snipping Tool not working” issue can be frustrating, but with these solutions, you can troubleshoot and resolve the problem. Remember to update drivers, adjust settings, and follow the steps provided to ensure the Snipping Tool operates smoothly, allowing you to capture and share your screen effortlessly.